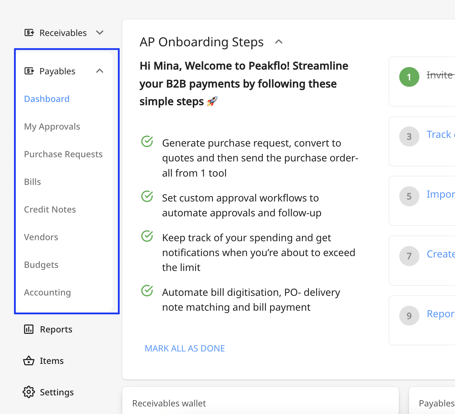
Below is the Peakflo navigation panel view for admin:
Before getting started, below are a few articles that you should check out:
This guide is divided into below sections:
- How to set approval policies?
- How to configure approval notification?
- How to set rules?
- How to create custom fields?
- What is AP Dashboard?
- How to manage vendors?
- How to create purchase request?
- How to create purchase quotes?
- How to create purchase orders?
- How to manage budget?
- How to manage bills?
- How to manage GRN and SRN?
- How to manage credit notes
- How to check my approvals
- What are accounts payable reports?
- Where to check transaction details?
Approval Policies
Setting up approval policies is one of the first steps toward setting up your payables account in Peakflo.
1. In your dashboard, click 'Settings' from the left navigation menu and go to 'Approval policies'. 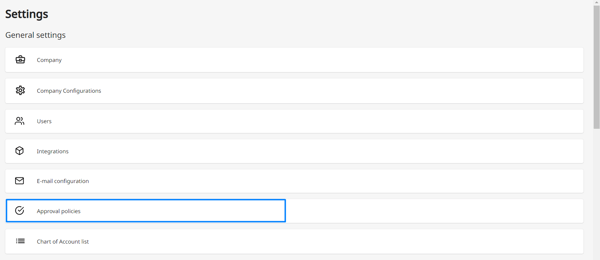
2. Click on the Add New button.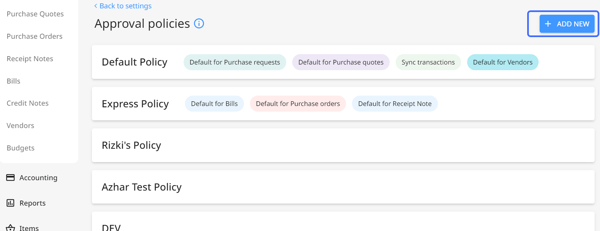
3. The approval policy box will appear. Add the name of the policy and simply tick any of the boxes to configure whether you want to apply the policy for Purchase Requests, Purchase Quotes, Purchase Orders, bills, transactions, receipt notes, vendors, or all of them!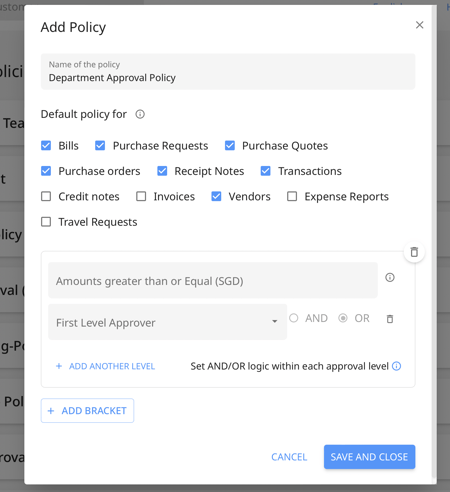
4. Then, you can set the amounts, assign multi-level approvers in your organization, or add more brackets to extend your policy.
What are approval levels?
Approval levels are where you can add multiple layers of approval for the bill payment. For example, you can add team member 'A' as the first-level approver. Once approved by team member 'A', it will pass on to the second level approver, team member 'B'. This helps refine the review process of all the bills before pushing them for payments. To cater to the most complex requirements. Peakflo can support up to 10-level approvals
What are approval brackets?
Approval brackets allow you to add more approval layers when more money is involved. For example. You can set an approval bracket of value between $0- $100 for auto-approval, $100-$1000 to a manager, and anything above $1000 to the director. This helps in bringing in the right stakeholders to review and approve high-value bills.

In the approval levels, you can add users, the Direct Managers, and also add approval rules.
If you want to accommodate approvals for different departments and business units, take advantage of rules for easier management.
By adding multiple rules to an approval level, the approval policy will automatically branch off to route to the right approval rules.
You can add multiple levels of approvals and multiple approvers in each level too.
You can set AND/OR logic within each approval level:
- AND: All approvers within the level must give their approval. This means that for a request to proceed to the next level of approval, every approver assigned to that specific level must provide their approval.
- OR: Any one of the approvers within the level can approve the request. This means that as soon as one approver gives their approval, the request can move forward to the next level without waiting for all approvers to respond.
5. Once you've filled in all the details and added the team members in different approval levels, click Save and Close to set your approval process live.
Different levels of approval along with the people responsible for the approval are visible on individual bill/PQ levels. This is what we call the audit trail.
.png?width=450&height=535&name=pasted%20image%200%20(1).png)
The default approval policy is set on 3 levels: account, budget, and vendor. Admins have access to edit all policies. Below is the priority level when creating a bill/PO:
- Default approval policy set for vendor
- Default approval policy set for budget
- Default approval policy set for the account
💡TIP:
Make sure there is one AP approval workflow that is set as a default policy for bills, POs, and transactions.
To know more about creating approval policies, please refer to:
- How to set up approval policies for Accounts Payable?
- How to set up payment approval workflows for bill payments?
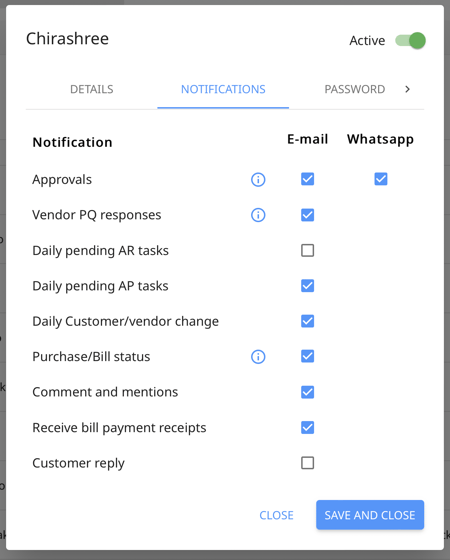
Configure the types of approval emails notifications
To avoid spam and facilitate clearer communications, you can set the types of emails that you would like Peakflo to send to the internal teams.
As usual, go to ⚙️ Settings and go to Users. Click on the user whose notification settings you'd like to edit.
Click the Notifications page in the user pop-up, and tick any of the boxes regarding which type of approval emails or WhatsApp notifications - or even other kinds of notifications - for the users to receive.
When a bill/PQ/transaction is pending on someone’s queue, they get 2 types of notification:
- Immediately when the PQ/bill/transaction enters their queue
.png?width=450&height=525&name=pasted%20image%200%20(3).png)
- Start of the day as part of their daily briefing email
.png?width=450&height=545&name=pasted%20image%200%20(2).png)
Rules Engine
This is the most customized rules engine present in any of the accounting systems or their plugins. Admins can create rules for the Bill, POs, and their line items. Also, you can add vendor and approval rules.
You can get creative in the way you use them. A few of its applications are:
- Show custom fields during the creation of a bill based on some conditions
.png?width=600&height=291&name=pasted%20image%200%20(13).png)
- Show bills to users based on the vendor name or custom fields.
.png?width=600&height=196&name=pasted%20image%200%20(14).png)
- Ensure that the OCR matches line items with the existing inventory only.
.png?width=600&height=184&name=pasted%20image%200%20(15).png)
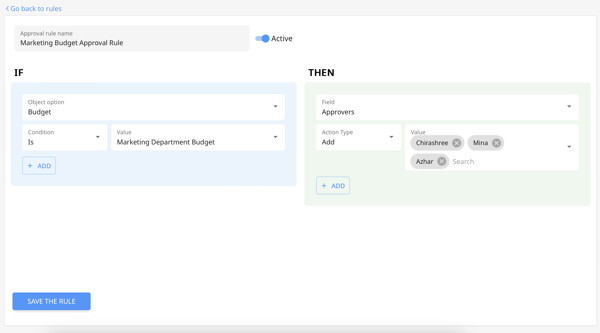
- Set approval rules for budget management for a specific department.
Custom Fields
Peakflo gives admins the option to create Custom Fields for bills and PQs. These can be used to add any details about the bill or the PQ, such as brand information or the requesting department.
We have various kinds of input types for the custom fields. Admins can mark them as mandatory or show them in the bill/PQ table view.
To add these, go to Settings and look for Custom Fields.

Read More About Custom Fields:
The fields are visible in table view of the PR/PQ/PO/RN/Bill/Transaction/Vendors and editable in their edit forms too.

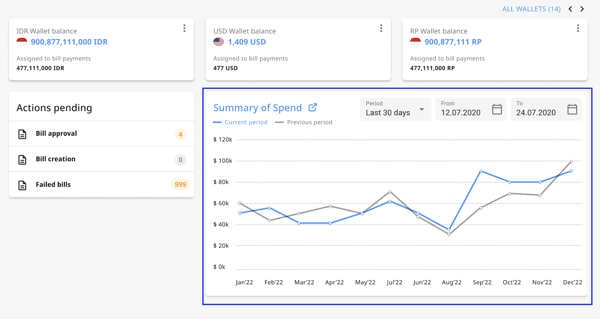
Dashboard
The dashboard shows the following 3 items:
- AP pending actions in the Peakflo account
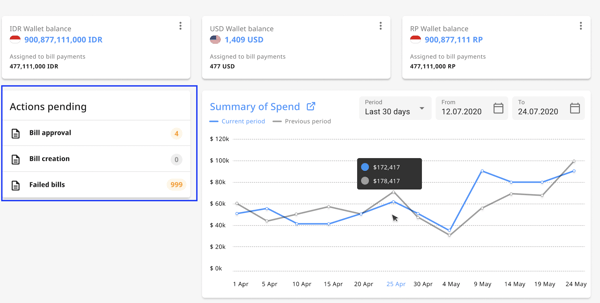
- List of AP Wallets with currency and current balance. Admins have access to top-up these wallets.
.png?width=600&height=203&name=pasted%20image%200%20(21).png)
- Summary of spend in the selected period, which also shows the trend of payables in the past.
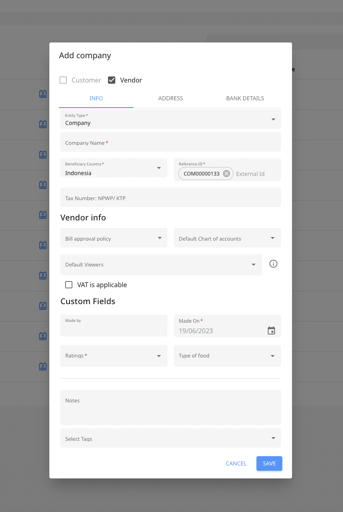
Vendor
Before raising any bills/POs, we need to create vendors.
Admins and have access to create and edit all vendor details such as addresses, bank details, and contacts. Vendor details have a 2-way sync between Peakflo and your accounting system. All vendors created in your accounting system will be present to your Peakflo account and vice versa. The synchronization happens every 5 mins.
Here are some items to take into reminder when creating vendors:
- Custom tags can be created to categorize the vendors. The categorization depends entirely on your company. Popular categories to tag your vendors can be based on spending habits, the line of business, the size of the company, etc. Contact your Peakflo partner to set this up for your company!
Here's an example of tags: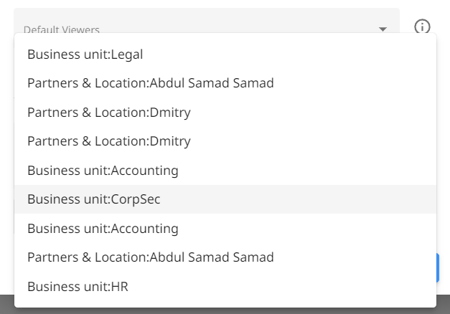
- When creating a bill/PQ for a vendor, the default chart of accounts (CoA) will automatically be populated on a line item level. Default CoA should be confirmed with the company’s accountant. Admins and accountants have access to modify the CoA before the bill is paid. If the Peakflo account is integrated with an accounting system, the list of COA is populated automatically from the accounting system.
-gif-gif.gif?width=688&height=405&name=WHATS-NEW-DEC-22_CHART-OF-ACCOUNTS_ALT2%20(2)-gif-gif.gif)
- When creating a bill/PQ for a vendor, the default approval policy (set on the vendor level) will automatically be populated. The default approval policy should be set by admins according to company policies for procurement and purchase. This can be modified by admins when the bills/POs are in a DRAFT state.
- Users added as default viewers will be able to view all bills/POs belonging to that vendor. You can also add multiple users.
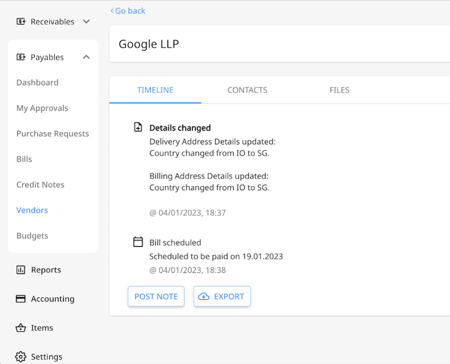
- The vendor timeline highlights all actions carried out, including the status of the corresponding bills. To access a certain vendor timeline, click on any vendor name.
Purchase Requests
The procurement team has access to view and create PRs.
From the left sidebar, click on "Purchase Requests" under the "Payables" tab then click on "Add New" to create a new PR.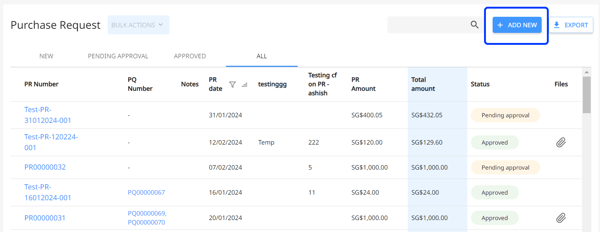
A new window will appear. Fill in all the details to create a PR.
Learn more about how to create PRs: How to create a purchase request and send it for approval?
After the PR is created, click on the newly created purchase request and click on the "Send for Approval" button to submit the PR for approval. 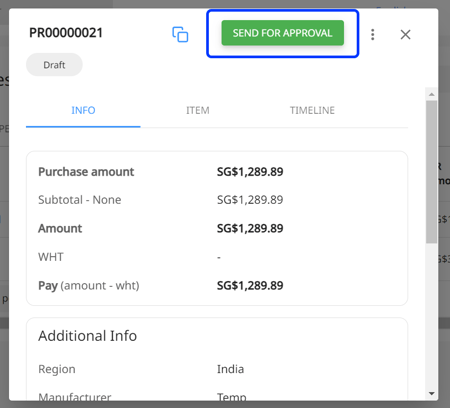
In the timeline you can see when the PR has been approved and when it matched with the PQ.

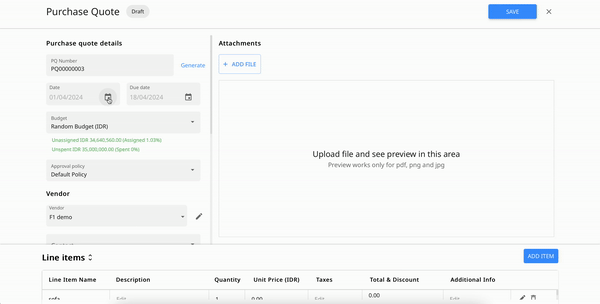
Purchase Quotes
The procurement team has access to create, edit, and track PQ.
You can view the PQ details by clicking on a particular PQ.

If you want to know more about how to create PQ and how to approve them, refer to how to create a purchase quote and send it for approval.
To edit a PQ, you can click on the PQ and then choose the Edit button from the three-dot menu.

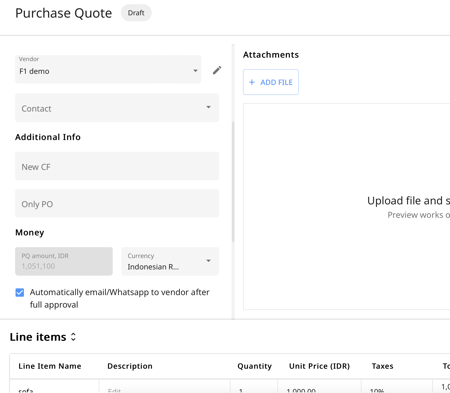
You can also directly send the purchase quotes, once approved, via mail or WhatsApp to the corresponding vendors' contacts. Simply select the contacts to send the PQ to along with their corresponding communication channel.

Do not forget to also tick "Automatically send to the vendor after full approval"!
Recommended reads:
Purchase Order
The procurement team has access to view, create, and edit POs.
When the PQ is fully approved, the same document transforms into PO automatically. By clicking on the "Create PO" button from the PQ tab you can generate a purchase order.

Additionally, POs can be mass uploaded to Peakflo. Check out this article for more details: How to mass upload purchase orders?
If your Peakflo account is integrated with an accounting system, we sync all your POs created in Peakflo into your accounting system. Learn more about how the data flow works on the Integrations page.
Once a PO gets full approval, it will show up in the Purchase Orders section, under the Approved-open column.

When the PO amount matches with 1 or multiple bills, the PO goes to the Approved-closed state AKA completely billed.
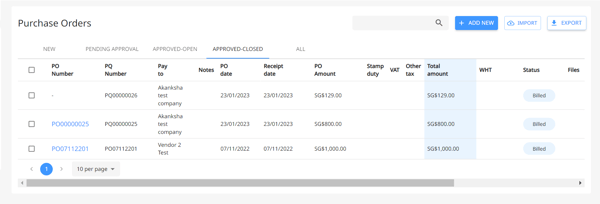
Peakflo also tracks any changes to PO and captures them in the timeline. Simply go to Purchase Orders and click on any PO you'd like to see. Bill maker/checker can view the entire history of the PO with the PO timeline.

Budgets
Put your budget management in easy mode! You can track the amount of money spent on any project/campaign or by a department in real-time.
To check the details of each budget, click on the budget name. You can see all the bills related to the budget along with the monthly budget reports.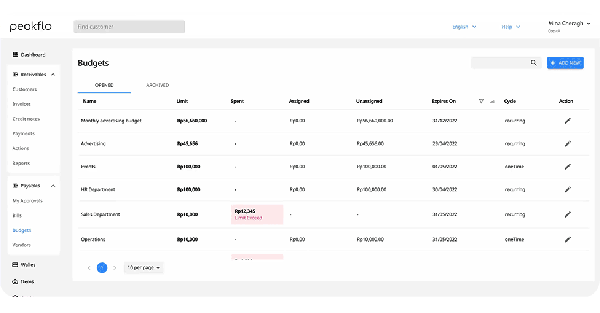
The details and status of all the bills assigned to the budget are also available here.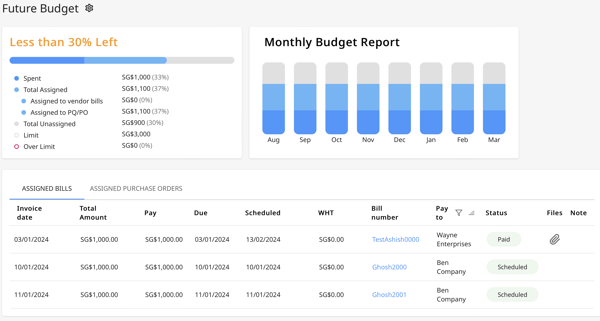
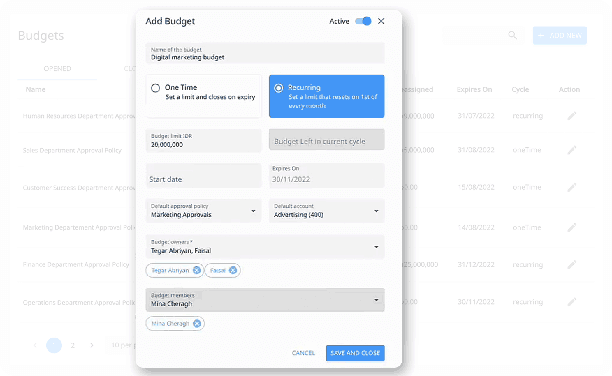
Admins have access to all budgets. Learn how to create budgets.
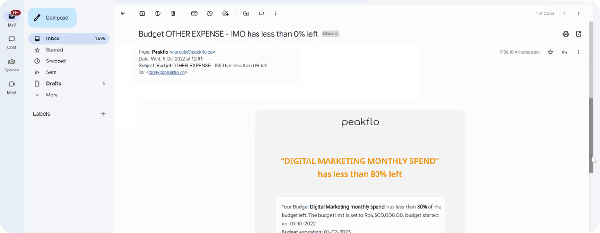
Budget owners will get email notifications once the budget limit exceeds 50%, 80%, or 90%, and when the budget is finished or has exceeded the initial amount.
Bills
Procurement team have access to all bills and modify all fields. They can override the defaults of the approval policy, budget, bill payment date, bill payment method while the Bill is in the Draft state.
You can also mass upload bills to Peakflo (in case you're not connected to accounting software).
To know more about mass upload or manual creation of bills (in case not connected to accounting software), please visit our help portal on how to create and upload bills.
Bills can also be automatically scanned using our OCR system. Vendors or Peakflo users can directly send the bill copy to our OCR mailbox. Peakflo automatically scans bill details with a high-level accuracy and saves them without any manual data entry. Sample mailbox details are mentioned below:
-gif.gif?width=600&height=284&name=users-can-access-the-email-to-send-bills%20(1)-gif.gif)
📘 Learn: How does OCR work?
If your Peakflo account is integrated with the accounting system, we will sync all the bills created in Peakflo to your accounting system. The synchronization happens in twice:
- When the bill is fully approved
- When a bill is paid and the corresponding transaction is fully approved
To create a bill from scratch, go to the "Bills" tab under the "Accounts Payable" section and click on "Add New".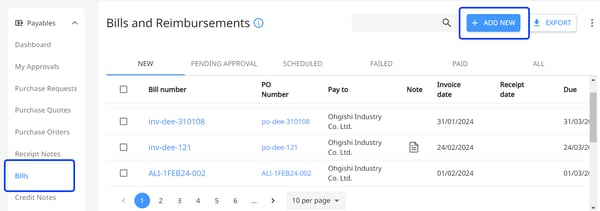
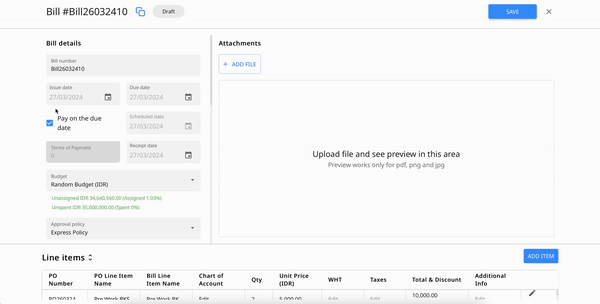
Add the information in the bill edit form and don't forget to match the bill with a PO by clicking on the "Match PO" button.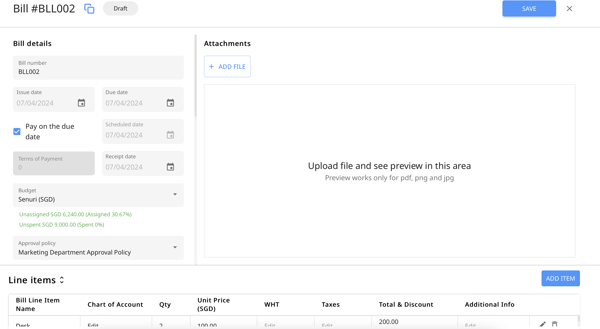
Bills can be matched to POs directly from the UI itself. This will automatically populate the PO line items and vendor details, avoiding any interim human error and skipping the time-consuming task of manual data entry.
📘 Read:
Procurement team can also add and edit bill line item details and tax details.
Recommended Reads:
Peakflo also captures bill history in its timeline. Go to the Bills section and click on the bill you'd like to see the details.

We can even automate payments if you've enabled Peakflo wallet. Once the bill receives full approval, it goes to the scheduled state. On the bill's due date, payment will automatically be paid with the Peakflo wallet.
We keep the finance team and bill creator, updated with the details of the payment which can be found in the following email notifications:
- When a payment is successful:
.png?width=450&height=497&name=pasted%20image%200%20(8).png)
2. When a payment is failed:
.png?width=450&height=507&name=pasted%20image%200%20(9).png)
3. When the wallet is low on funds:
.png?width=450&height=499&name=pasted%20image%200%20(10).png)
So you don't have to worry about vendor payments, Peakflo's got your back! 💙
Procurement team can manually mark a bill as paid too. To manually mark a bill as paid, choose the bill you want to mark as paid. Click on the three dots on the top left of the bill and choose "Mark as paid".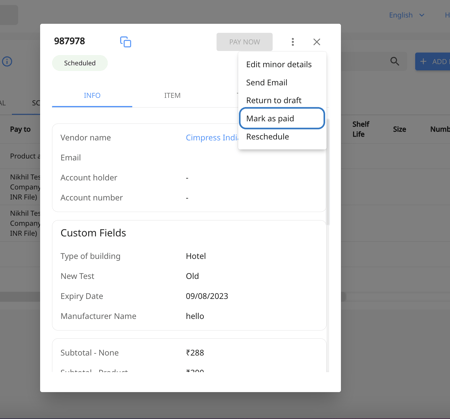
Learn more here: How to manually mark bills as paid in Peakflo?
Receipt Note
For creating and approving Goods Receipt Note and Service Receipt Note in Peakflo, ask support@peakflo.co to enable the feature first.
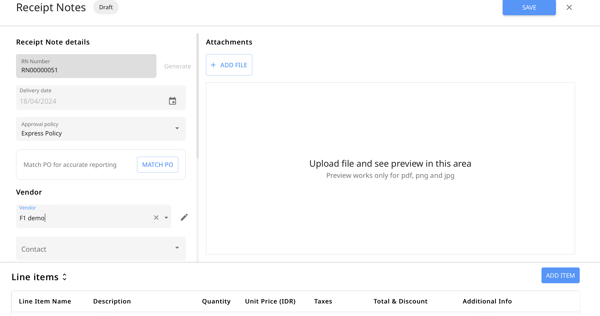
Once the feature is enabled in your Peakflo account, go to "Receipt Notes" under the "Payables" section and click on "Add New" from the right side of the screen.
.png?width=600&height=227&name=Group%20337%20(1).png)
Fill out the information in the RN form and assign an approval policy for the RN.
Note
- If needed, you can auto-generate the RN number or add a specific RN number
- Delivery date should be equal to or greater than the date on the purchase order.
In case there's an available purchase order for the RN, please click on "Match PO". In case there are any "Inconsistent Matching" in the RN, Peakflo will flag them before saving like the example below: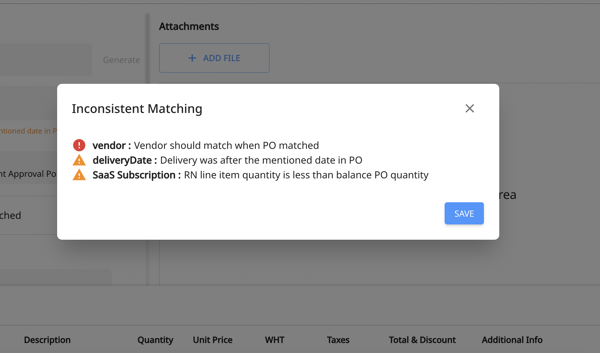
Recommended Read: How to validate three-way matching in Peakflo?
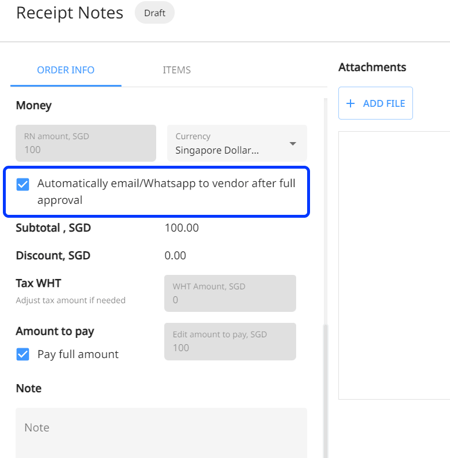
Tick the highlighted box on the RN form in case you wish to send the RN via WhatsApp or email to the vendor after full approval.
To learn more in details, check out the articles below:
Credit Notes
Tag vendor-generated credit notes to your bills so that the correct payable amount is reflected in the system and payment is made accordingly.
Once a vendor is selected while creating credit notes, all the associated bills are fetched and displayed. The credit amount mapped to bills can be partial or full. Credit notes require approvals by Admins.
If this feature is not available by default, please contact your Peakflo partner. Learn more about how to create credit notes and link to bills.
.png?width=600&height=325&name=pasted%20image%200%20(18).png)
If the Peakflo account is integrated with an accounting system, credit notes created in Peakflo will be synced to your accounting system within minutes!
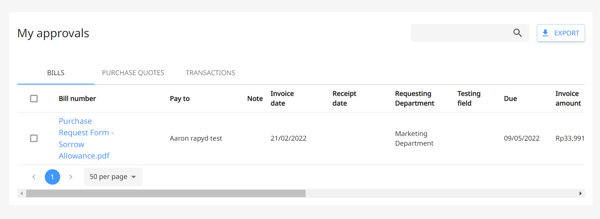
My Approvals
This is the section where all bills/PQ/transactions pending with the approvers are shown. When approval items come to the user’s queue, they can receive notifications by Whatsapp or email. Users can approve, decline, or change the status to draft.
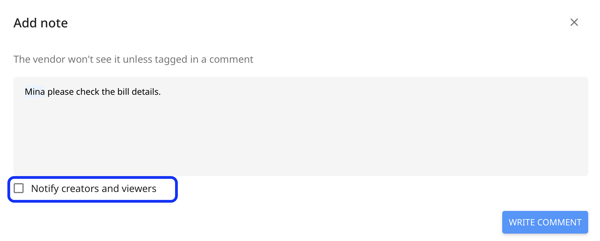
With these approvals, users can add comments and also mention other users to highlight changes or for audit purposes. Mentioning a user will enable view permissions of the bill/PO to that user.
.png?width=600&height=400&name=pasted%20image%200%20(16).png)
Important Note
When adding "@mentions" in the comments, if you want to send the notification to bill creator and bill viewer along with the mentioned user then check the box "Notify creators and Viewers".
- Bill creator is the user who created the bill.
- Bill viewers are:
- All bill approvers are added as bill viewers
- Default viewers from vendors are added as bill viewers
- Anyone mentioned in the bill is added as a bill viewers
- Rules can add bill viewers
- If the user is a budget admin, then the user is a bill viewer
If you don't want bill viewers and creators to get notified and only want the person whom you have mentioned to get the comment, you need to untick the box "Notify creators and Viewers" before clicking on "Write Comment".
This page is mobile optimized so users can view attachments and approve bills/POs right from their fingertips.
-gif.gif?width=450&height=351&name=WHATS-NEW-DEC-22_access-all-approvals-from-the-tip-of-the-palm%20(1)-gif.gif)
The notification settings can be accessed from Settings. Click on Users and click on a specific user you'd like to see the Notification details of. Admins have access to edit this for any user.
.png?width=450&height=538&name=pasted%20image%200%20(17).png)
Reports
Following are the reports in the Payables module:
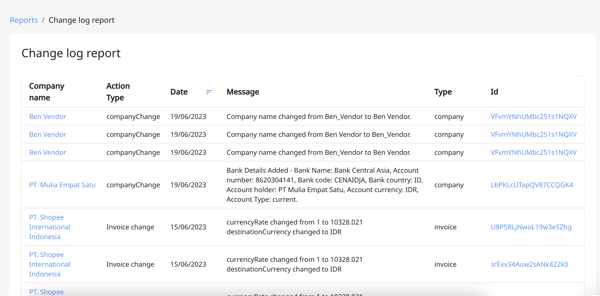
- Change log report. This report highlights any changes done to the vendor/bill/PO details. It captures the fields changed along with the owner of the changes. Peakflo also shares an end-of-day email notifying admins about the latest 5 changes made. This is to ensure that transparency is maintained along with the full audit log.
- Aging payables report: Admins have access to view and export the aging payables report. An accounts payable aging report is a critical accounting document that summarises the bills and invoices owed by a business, broken down by vendor and due date. Aging involves categorizing your company’s unpaid customer invoices and credit memos by date range. The report can be seen in a 15 days or 30 days period past the due date.
.png?width=600&height=286&name=pasted%20image%200%20(19).png)
If you have a presence in multiple countries, we will show a summary of pending payables per vendor and per currency.
.png?width=550&height=111&name=pasted%20image%200%20(20).png)
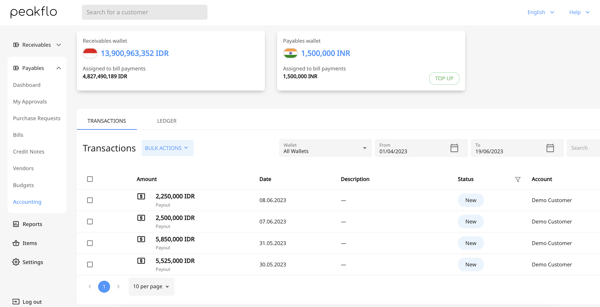
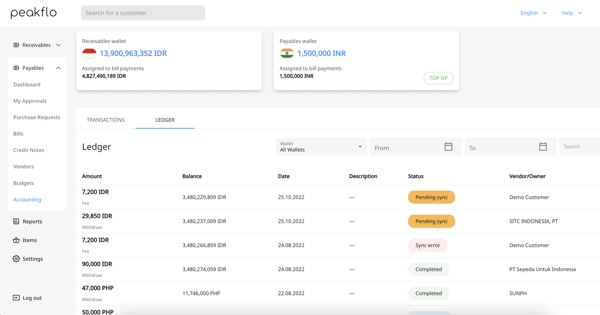
Accounting
This page contains all details associated with transactions and the ledger. All wallet transactions are detailed here: deposit, payout, top-up, payment, and transfer.
Transactions also go through the approval policies tagged to them. Admins can also export transaction and ledger tables. Transactions can be synced to your accounting system if there is an integration.
Transactions should typically be reviewed by the company's accountant before they are approved for synchronization. These transactions are akin to your bank transactions which will be reconciled in your accounting software with the corresponding account transactions, automatically by Peakflo.
If you have queries about any module, feel free to contact your Peakflo partner or contact us at: support@peakflo.co