Every customer is unique, so it's only natural that you'd want to tailor your communications. To do that you first need to understand what is a placeholder.
What is a placeholder?
You've probably noticed that there is always that bracket with some text in it when you are using the action templates. These are placeholders, and they auto-fill whatever is between the brackets.
List of Placeholders
Here is a list of the placeholders that Peakflo supports (please watch out for the capitalizations - if not spelled properly, the placeholders will be marked as incorrect tags!)
Customer Information
{{recipientName}} - Full recipient name (e.g. Bruce Wayne).
{{recipientFirstName}} - First name (e.g. Bruce).
{{customerCompanyName}} - Payer company name.
{{customerID}} - Payer account ID.
You can view the Customer ID of a customer under the details section in the Customers tab.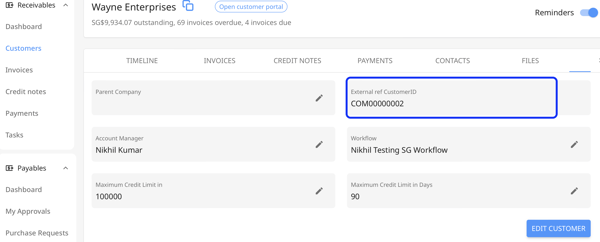
{{payerCustomField.CUSTENTITY_OPERATOR_ID}} - Custom fields for the customer details.
To find the CUSTENTITY_OPERATOR_ID, please go to "Settings", and click on "Custom Fields" and the ID of the custom field is listed right under the custom field name.
Example: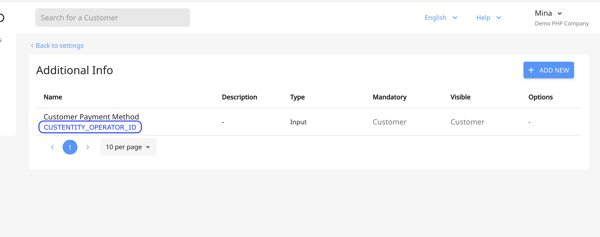
Company Information
{{accountManagerName}} - Account manager assigned to the Payer company.
{{amPhone}} - Account manager's phone number (make sure it's set in the User Management).
{{logo}} - Embed company logo in automatic email reminders.
Invoice Details
{{invoiceNumber}} - Invoice number
{{taxNumber}} - The tax number of the invoice issuer company
{{myTaxNumber}} - The tax number of the company that needs to make the payments
{{invoiceAmountDue}} - Invoice amount due (in your default/ base currency.)
{{invoiceIssueDate}} - Invoice issue date.
{{invoiceDueDate}} - Invoice due date.
{{invoiceDaysOverdue}} - Amount of days invoice is overdue.
{{totalAmountDue}} - Total amount due (in your default/ base currency) from company payer (sum of all invoices that are due, not overdue, for the payer).
{{totalAmountOverdue}} - Total amount overdue (in your default/ base currency) from company payer (sum of all invoices that are overdue for the payer).
{{totalAmountDueAndOverdue}} - The total amount of the due and overdue invoices (in your default/ base currency).
{{totalOutstanding}} - Total amount of all invoices minus all payments and credits (in your default/ base currency).
{{total_overdue_with_interest}} - Total of the overdue invoices with interest (in your default/ base currency).
{{total_unapplied_payments}} - Total unapplied payments for each customer (in your default/ base currency).
{{overdue_net_of_unapplied_payments}} - Total overdue amount (in your default/ base currency) excluding unapplied payments (if any) at the customer level (Sum of all invoices that are overdue for the payer - sum of all unapplied payments for the payer)
{{myOrgName}} - Current company name (invoice issuer).
{{list_outstanding_invoices}} - List of outstanding invoices (example output: INV-0004, INV-0005, INV-0006).
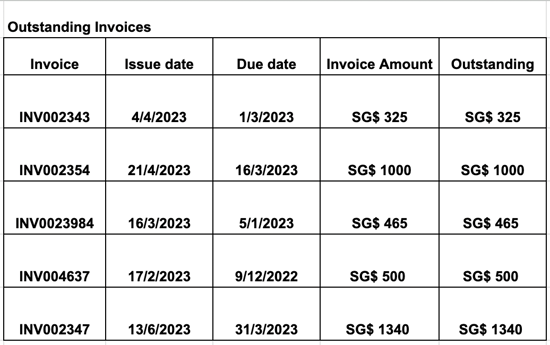
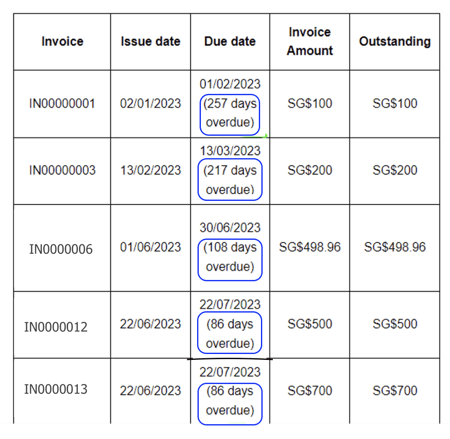
{{table_outstanding_invoices}} - Embed a table of outstanding invoices from the payer company in automatic email reminders. Example below.
{{list_overdue_invoices}} - List of overdue invoices (example output: INV-0001, INV-0002, INV-0003).
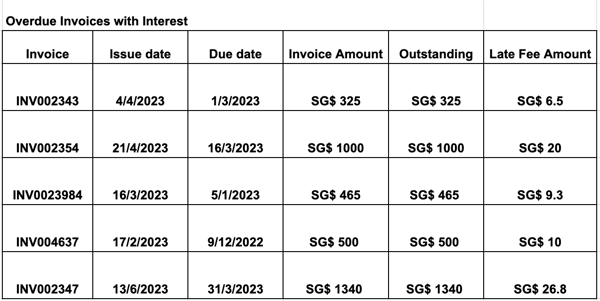
{{table_overdue_invoices}} - Embed a table of overdue invoices from the company payer in automatic payment reminders. Example below.
{{table_current_outstanding_SOA}} - Embed a table of Statement of Account (SoA) which includes outstanding invoices, unapplied payments, and unapplied credit notes from the payer company in automatic payment reminder. Example below:

{{longest_overdue_days}} - Number of days overdue for the longest overdue invoice.
{{note}} - Invoice note.
{{invoiceCustomField.CUSTENTITY_OPERATOR_ID}} - Custom field for invoice details.
Important Note
When you configure reminders using a “day of the month” schedule, you cannot use individual invoice-level placeholders such as invoiceNumber, invoiceIssueDate, totalAmountDue, etc. This is because “day of the month” reminders are designed to reference groups of invoices rather than a single, specific invoice.
list_ or table_, such as, list_outstanding_invoices, table_overdue_with_interest, etc.In the table placeholders, you have the option to exclude disputed invoices. If you would like to enable this feature, please reach out to Peakflo at support@peakflo.co for assistance.
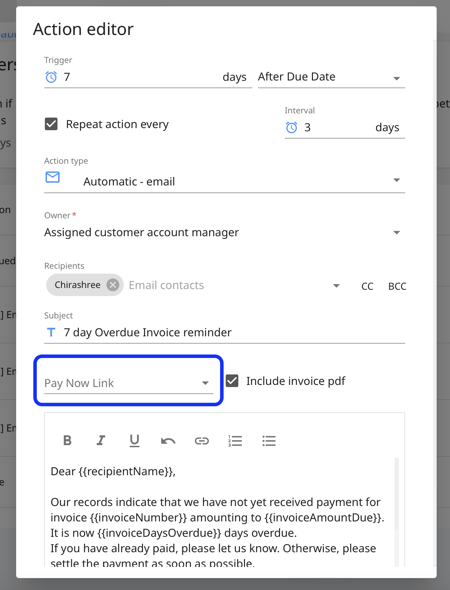
Customer Portal & Customer Payments
If you want to add customer portal and customer payment links in the email body then use these placeholder below:
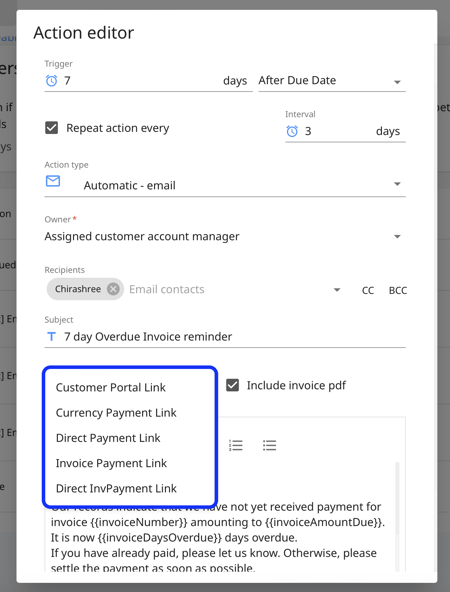
{{{customerPortalLink}}} - Link to the portal for your customers to check all their payables and check their summary of account.
{{{currencyPaymentLink}}} - A direct link to the payment page for your customers to select a payment method, input withholding tax (if applicable), and clear outstanding invoices.
{{{invoicePaymentLink}}} - Link to the payment summary page for your customers to make payments for a single invoice through bank and QRIS.
{{{directPaymentLink}}} - Link for customers to make payments directly through the payment gateway, without needing to use the Peakflo customer portal. The amount of the payment is equal to the sum of the outstanding amounts of the invoices.
Note
Depending on the country the payment method will be:
- Indonesia: Supporting QRIS
- India: Supporting all payment methods
- Singapore: Supporting bank transfer
{{payment_details}} - Details of the payment, such as account name, bank name, and unique virtual bank account number. (This feature is available in Indonesia and Singapore)
In order to get access to the payment links listed above, you need to enable payments. Please send an email to support@peakflo.co to enable the payment link.
{{{legalEscalationLink}}} - Link to legal escalation report for internal legal team.
How do you use them?
I've got two magic words for you: copy/paste. This is going to save you time and make sure there are no typos.
Let's look at one of our templates:
But maybe you want to be sterner and provide more info? Copy-paste the correct placeholder and insert it into your new custom email:Dear {{recipientName}},
Just a friendly reminder that invoice {{invoiceNumber}} for {{invoiceAmountDue}} is due today. Please click on the following link to view all pending invoices.
Enjoy your day!
{{myOrgName}}
Dear {{recipientName}},Your invoice {{invoiceNumber}} was due on {{invoiceDueDate}}. Because your balance of {{totalAmountOverdue}} was not paid within the given time frame, we have escalated the invoice to our legal team.Please click on the following link to view the Legal Escalation Report filed by our Legal Team.Best,{{myOrgName}}
What if you want to hyperlink a selected text?
Just type the phrase you want to link, like "Click Here" or "Escalate Now," highlight it with your mouse, and click the link icon in the editor.
.png?width=78&name=Untitled%20(2).png)
Next, type or paste the necessary URL from the list above in the space. For example, {{{legalEscalationLink}}} or {{{customerPortalLink}}}.
.png?width=428&name=Untitled%20(1).png)
When you're done, click the checkmark. That's it! With the placeholder, you can send out custom messages without custom labor.
|
⚠️ Keep in mind that other placeholders can't be used as a URL. |