Table of Contents
Navigation of Peakflo Workflow
Sign-up & Login Process
Sign-up Process
-
Go to https://app.peakflo.ai/ and click on the “Register” option.

-
Enter your email ID and create a password for your account. Then click on the “Register” button.

-
You will see a message to confirm your email address for authentication.

-
Check your email inbox for a message titled "Confirm Your Signup" and click on the "Confirm your mail" link to verify your email address.

-
The link will redirect you to the login page, where you can click on "Login" to access your account.

Login process
If you already have your login credentials, follow these steps to log in to Peakflo:
-
Go to https://app.peakflo.ai/
-
Enter your email ID and password.
.png?width=600&height=331&name=Screenshot%202025-08-15%20at%205.32.58%20PM%20(1).png)
-
Click “Login” to access your account.
Password Reset
-
In the Login page, click on the “Reset my password” option.

-
Enter the email address linked to your account, then click “Forgot password”.

-
Check your inbox for the password reset email and click on the “Reset Password” link.

-
On the password reset page, enter your new password and click “Submit”.

Navigation of Peakflo Workflow
Company Setup
A Company in Peakflo refers to an independent workspace for a company or business entity. You can have multiple Companies and can easily switch between them without logging out.
Click the Company drop-down in the sidebar menu to quickly switch to another Company or create a new one.

How to Create a Company?
- Click on the Company drop-down in the top-right corner.
- Select “Create a new company”.
- Fill in the required fields:
- Name – The name of your company or entity.
- Country Code – Choose the primary country of operation.
- Currency – Set the default currency for transactions.
- Click “Continue” and your new Company will be set up with default settings, ready for customization.
Refer to the video below for the step-by-step visual guide.
How to Switch Companies?
- From the list of companies you have access to, click on the one you want to switch to.
- Your dashboard will refresh, showing data and workflows for the selected Company.
Settings
In the "Settings" section, you can configure and manage various aspects of the system. The following options are available:
-
Users – Manage user accounts, roles, and access permissions.
-
Annotations – Configure annotation settings for evaluations.
-
Knowledge – Manage knowledge base entries.
-
Alerts – Set up and customize alert notifications.

How to Add Users?
-
Go to “Settings”, then “Users”, and click on “Invite Users” to add a new user.

-
A pop-up will appear, fill in the user’s email address, and the role the user will have. Then click on “Send Invite.”

-
The user will receive an email invite to Peakflo. They can click on “Accept Invite” to log in to the platform.

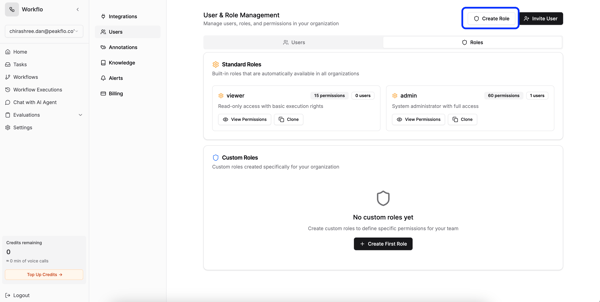
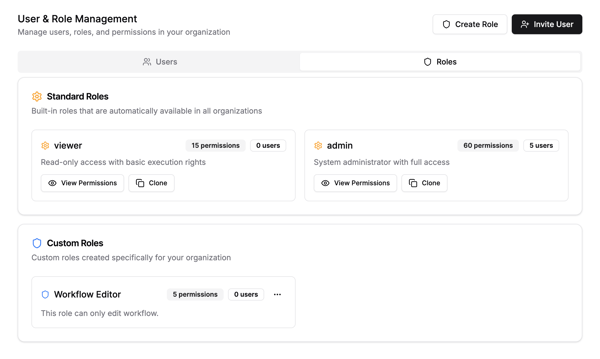
How to Define a User Role?
-
Go to “Settings” then “Users” and click on “Role” to view, edit, or create roles.

-
To view permissions of a role, click on “View Permissions.”

A pop-up will appear with the permission details.

3. To create a new custom role, click on “Create Role”.
4. A pop-up will appear. Here, you can name the new role under “Name”, define what this role can do under “Description”, and select the permissions the role will have. Then, to save the role, click on “Create Role.”

5. You will now see the new role under “Custom Roles.”
How to Add Annotations?
-
Go to “Settings”, then “Annotations” and click on “+ Add Annotations” to add a new annotation.

-
In the pop-up window, complete the required fields as follows:
- Code – Unique identifier for API usage; must start with a letter and only use lowercase letters, numbers, and underscores.
- Display Name – Human-readable name for the annotation
- Description – Short explanation of the purpose of the annotation.
- Value Type – Defines the type of data stored (e.g., Boolean, String, Number).
Then, click on “Create” to save it.

-
Then, click on “Create” to save it.
How to Add Alerts?
-
Go to “Settings”, then “Alerts”, and click on “+ Create Alert” to add a new alert.

-
Enter the details for “Basic Information” as follows:
- Alert Name — Enter a descriptive name for the alert.
- Description — Provide a clear description of what the alert monitors.
- Alert Type — Choose what type of condition to monitor
- Score Threshold Alert: This type triggers when a score crosses the defined threshold.
- Credit Threshold Alert: This type triggers when a credit balance crosses the defined threshold.

-
If choosing “Score Alert Configuration”, enter the details as follows:
- Annotation Config — Select the annotation configuration you want to monitor.
- Aggregation — Choose how the scores should be aggregated (e.g., Average, Count, Max, Min).
- Threshold — Enter the score threshold for triggering the alert.
- Operator — Choose the comparison operator (e.g., Greater Than, Less Than, Equals).
- Time Window — Define the time range for evaluating the condition.
- Workflow (Optional) — Select a specific workflow to limit monitoring.

-
If choosing “Credit Alert Configuration”, enter the details as follows:
- Credit Threshold — Enter the numeric limit that will trigger the alert.
- Operator — Choose how the current credit is compared to the threshold.

-
Enter the details for “Notification Settings” as follows:
- Notification Channels — Select how you want to receive alerts: Email, SMS, or both.
- Cooldown Period — Defines the minimum time between alerts to prevent repeated notifications.
- Email Recipients — Add the email addresses of the recipients who should receive email alerts.
- Phone Numbers — Add the phone numbers of the recipients who should receive SMS alerts.
- Custom Notification Template (Optional)
- Subject Line: Insert the alert’s name.
- Message Body: Insert the message content.

-
To save, click on “Create Alert.”
Workflows
Click Workflows in the left sidebar menu to view, create, or edit workflows.

To create a new workflow from scratch, click on “+ New Workflow”

To view or edit an existing workflow, click to view it.

The workflow view will open up.

How to Set Up an Input Node?
-
Navigate to the top-left corner of your workflow builder and click the blue “+” button.

-
From the menu, select the “Input” option.

-
A new Input node will be created. Click on it to open its setup panel, where you can define the properties under “Output Fields” by clicking “+ Add Output”. Once all details are completed, click “Save”.

-
To connect it, click on the round element on the right edge of the input node until you see a “+” connector named “output”. Then, drag the connection line to the next node in your workflow.

-
Lastly, go to the “Save” drop-down option and click on “Save Changes.” This is an important step to ensure all your updates are stored.

How to Set Up an Output Node?
-
Navigate to the top-left corner of your workflow builder and click the blue “+” button.

-
From the menu, select the “Output” option.

-
A new Output node will be created, click on it to open its setup panel, where you can define the properties under “Input Fields” by clicking “+ Add Input”. Once all details are completed, click “Save”.

-
To connect it, click on the round element on the right edge of the previous workflow node until you see a “+” connector named “output”. Then, drag the connection line to the Output node in your workflow.

-
Lastly, go to the “Save” drop-down option and click on “Save Changes.” This is an important step to ensure all your updates are stored.
-png.png?width=688&height=350&name=Screenshot%202025-08-19%20at%2011-40-59%E2%80%AFAM%20(1)-png.png)
How to Make Changes to the Prompt?
- Open the node where you want to make changes to the prompt.
- Click on the “prompt” option under “Parameters”
- Make your updates and modifications to the prompt and click “Save Changes.”
- Lastly, go to the “Save” drop-down option and click on “Save Changes.” This is an important step to ensure all your updates are stored.
Refer to the video below for a details visual guide:
How to Make Output Optional?
- Open the “Output” node, and scroll to the “Input Fields” section.
- You will see the “Optional” toggle beside the input name. Click on the toggle to enable it.
- Then click on “Save Changes.”
- Lastly, go to the “Save” drop-down option and click on “Save Changes.” This is an important step to ensure all your updates are stored.
Refer to the video below for a details visual guide:
How to Perform Manual Executions?
- Click on the “Execute” button on the top right.
- A sidebar will open. Enter the required details in the input fields and click on “Execute.”
- You will see the live workflow execution.
Refer to the video below for a details visual guide:
How to Export a Workflow?
-
Click on the “Save” drop-down menu.

-
Click on the “Export Workflow” button to export the workflow.

How to Import a Workflow?
-
Click on the “Save” drop-down menu.
-png.png?width=600&height=304&name=Screenshot%202025-08-15%20at%206-51-45%E2%80%AFPM%20(1)-png.png)
-
Click on the “Import Workflow” button to import the workflow.

How to Delete a Node?
Hover over the node you want to delete. You will see the “Delete” option. Click on it to delete the node.

How to Delete a Workflow?
-
Click on the “Save” drop-down menu.
-png.png?width=688&height=349&name=Screenshot%202025-08-15%20at%206-51-45%E2%80%AFPM%20(2)-png.png)
-
Click on the “Delete Workflow” button to delete the workflow.

Workflow Execution
The Workflow Executions page lets you monitor and track your workflow history. You can see when workflows ran, check logs and evaluations, trace issues, and download audio files if your workflow involves voice actions.

Here, you can filter the workflow executions by
- Execution ID – Search for a specific workflow run
- Workflow – Filter by all workflows or a specific workflow
- Status – Filter by status (e.g., Completed, Failed)
- Date Range – Choose a time period to view executions
How to view a particular workflow execution and read tracing?
- Click on the workflow execution you want to view.
- Go to the “Tracing” tab.
- Scroll through to get the audit log. You can click on each component to deep dive into the details.
Refer to the video below for a visual guide.
How to get the audio file for a particular workflow execution?
- Click on the workflow execution for which you want to view the audio file.
- Go to the “Tracing” tab.
- Scroll down to the “voice_agent-resumed” component and click on it.
- Under “Output,” you will see an “audio” field. Click on the file.
- You will see an audio file. You can play it or download it by clicking the three-dot icon.
Refer to the video below for a visual guide.
How to view the evaluation for a particular workflow execution?
- Click on the workflow execution for which you want to view the evaluation.
- Go to the “Evaluations” tab.
- From the “Run Evaluation” drop-down, select the evaluation you want to run. Then click on “Run evaluation”.
- Once the evaluation is complete, you will be able to see the results under “AI Evaluations”.
Refer to the video below for a visual guide.
How to Launch a New Customer?
Launching a new customer in Peakflo involves setting up a new Company, managing workflows, and customizing the workflow for the customer. Follow the steps below:
Step 1: Create a New Company
- Click on the “Company drop-down” in the top-right corner of the dashboard.
- Select “Create a new company”.
- Fill in the required fields:
- Name – Name of the customer company.
- Country Code – Primary country of operation.
- Currency – Default currency for transactions.
- Click “Continue”. Your new Company will be created with default settings.
Refer to the video below for a visual step-by-step guide.
Step 2: Export Workflow
- Navigate to the Workflows section from the left sidebar of your default Company.
- Select the workflow you want to use as a template for the new customer.
- Click the “Save” drop-down menu and select “Export Workflow”.
Refer to the video below for a visual step-by-step guide.
Step 3: Switch Company
- Click on the Company drop-down in the top-right corner.
- Select the new customer Company you just created.
- The dashboard will refresh to show the new Company’s environment.
Refer to the video below for a visual step-by-step guide.
Step 4: Import Workflow
- Navigate to Workflows in the new Company.
- Click on “+ New Workflow”, add a name and description, and click “Create Workflow”.
- Click the “Save” drop-down menu and select “Import Workflow”.
- Upload the workflow file you exported in Step 2.
- Click the “Save” drop-down menu and select “Save Changes”.
Refer to the video below for a visual step-by-step guide.
Step 5: Customize the Workflow for the Customer
- Open the imported workflow in the workflow builder.
- Modify Input Nodes to capture customer-specific data.
- Update Output Nodes for customer-specific responses or actions.
- Adjust prompts and parameters as needed.
- Save the workflow using the “Save” drop-down → “Save Changes“ option.
💡 Tip: After customizing the workflow, perform a manual execution to verify that everything works correctly before going live.