---
title: How to Make Sure Vendors Receive the Payment Receipt File
description: "To make sure vendors receive their payment receipt file, AP teams need to add the vendor’s email address in the \"Notify vendor\" field when creating or updating a bill."
---
[Skip to content](https://help.peakflo.co/how-to-make-sure-vendors-receive-the-payment-receipt-file#main-content)
[](https://peakflo.co/)
- [Go to Customer Portal](https://help.peakflo.co/tickets-view)
- [Go to peakflo.co](https://peakflo.co/)
Open main navigation
Close main navigation
- [Go to Customer Portal](https://help.peakflo.co/tickets-view)
- [Go to peakflo.co](https://peakflo.co/)
Hello! How can we help you?
- There are no suggestions because the search field is empty.
1. [Help Center](https://help.peakflo.co/?hsLang=en)
2. [Accounts Payable](https://help.peakflo.co/accounts-payable?hsLang=en)
3. [Bill Management](https://help.peakflo.co/accounts-payable?hsLang=en#bill-management)
# How to Make Sure Vendors Receive the Payment Receipt File
## To make sure vendors receive their payment receipt file, AP teams need to add the vendor’s email address in the "Notify vendor" field when creating or updating a bill.
### When Creating a New Bill
1\. In the bill creation page, go to the **Vendor** section.
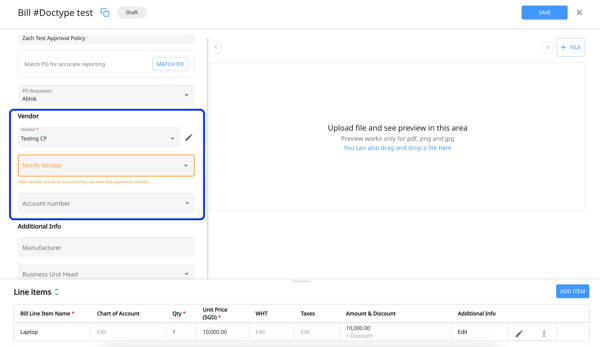
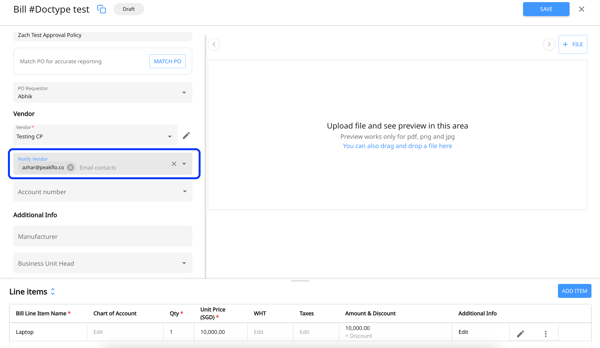
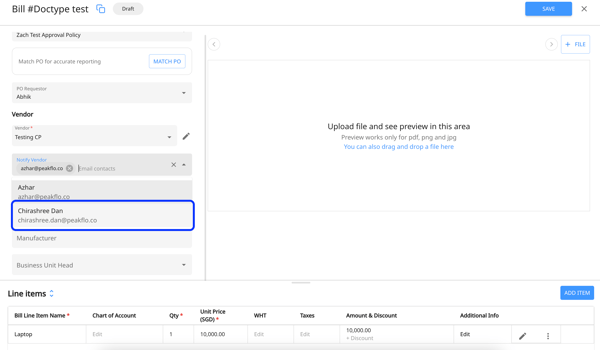
2\. In the **Notify vendor** field, add the vendor’s email address by selecting the contact from the drop down list. You can choose to add multiple contacts here as well.
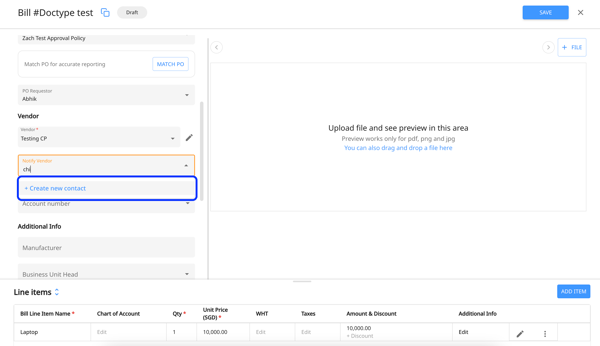
3\. If the required contact does not exist, click **Create new contact**.
4\. Enter the contact’s details, including their email address. Turn on the **Main Contact** toggel is the vendor contact is the primary contact.
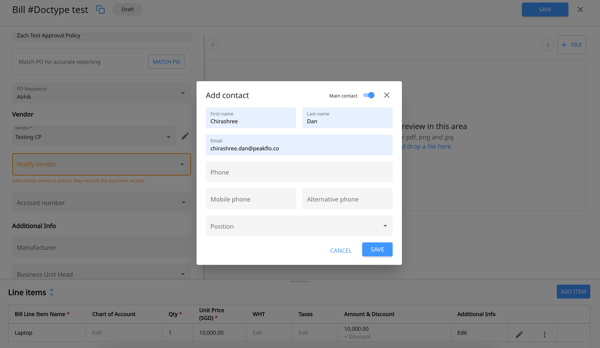
5\. Save the contact and select it in the **Notify vendor** field.
6\. Save the bill to process.
Once the payment is processed, the payment receipt file will be sent to the email address automatically.
### If the Bill Is Already Created
If the bill has already been created and the vendor’s email address is missing:
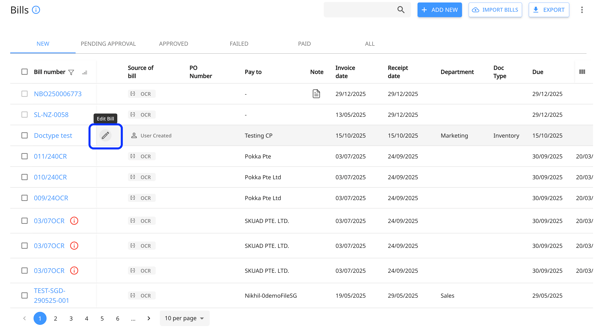
1\. Click **Edit pencil icon** to edit the respective bill.
2\. Go to the **Notify vendor** field under the **Vendor** section.
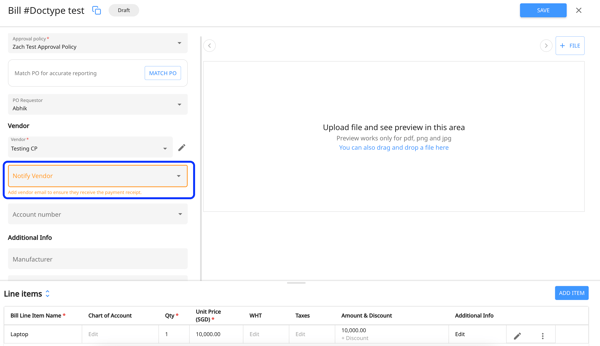
3\. Add the vendor’s email address by selecting the contact from the drop-down list.

4\. If the contact does not exist, click **Create new contact** and enter the required details. [Learn how here](https://help.peakflo.co/how-to-make-sure-vendors-receive-the-payment-receipt-file#new-contact)
5\. Save the changes.
Editing **Notify vendor** is disabled once the bill is approved. Always check the **Notify vendor** field before processing the bill to make sure the correct vendor contact is added and payment receipt notifications can be delivered.
**Related Articles**
- [How to add/update the vendor's contact information?](https://help.peakflo.co/how-to-add/update-vendors-contact-information?hsLang=en)
- [How to match the existing vendor or add a new vendor to the bill captured through OCR?](https://help.peakflo.co/match-existing-vendor-or-add-new-vendor-to-the-bill-captured-through-ocr?hsLang=en)
- [New to Peakflo?](https://help.peakflo.co/new-to-peakflo?hsLang=en)
- [Accounts Payable](https://help.peakflo.co/accounts-payable?hsLang=en#main-content)
- [Getting Started](https://help.peakflo.co/accounts-payable?hsLang=en#getting-started)
- [Rules](https://help.peakflo.co/accounts-payable?hsLang=en#rules)
- [Approval Workflow](https://help.peakflo.co/accounts-payable?hsLang=en#approval-workflow)
- [Custom Fields](https://help.peakflo.co/accounts-payable?hsLang=en#custom-fields)
- [Vendors](https://help.peakflo.co/accounts-payable?hsLang=en#vendors)
- [Purchase Requests](https://help.peakflo.co/accounts-payable?hsLang=en#purchase-requests)
- [Purchase Quotes](https://help.peakflo.co/accounts-payable?hsLang=en#purchase-quotes)
- [Purchase Orders](https://help.peakflo.co/accounts-payable?hsLang=en#purchase-orders)
- [OCR](https://help.peakflo.co/accounts-payable?hsLang=en#ocr)
- [Bill Management](https://help.peakflo.co/accounts-payable?hsLang=en#bill-management)
- [My Approvals](https://help.peakflo.co/accounts-payable?hsLang=en#my-approvals)
- [Goods Receipt Notes & Service Receipt Notess](https://help.peakflo.co/accounts-payable?hsLang=en#goods-receipt-notes-service-receipt-notess)
- [Budget](https://help.peakflo.co/accounts-payable?hsLang=en#budget)
- [Reconciliation](https://help.peakflo.co/accounts-payable?hsLang=en#reconciliation)
- [Reports](https://help.peakflo.co/accounts-payable?hsLang=en#reports)
- [Wallet & Transactions](https://help.peakflo.co/accounts-payable?hsLang=en#wallet-transactions)
- [Payments](https://help.peakflo.co/accounts-payable?hsLang=en#payments)
- [Vendor Onboarding Management](https://help.peakflo.co/accounts-payable?hsLang=en#vendor-onboarding-management)
- [Vendor Portal](https://help.peakflo.co/accounts-payable?hsLang=en#vendor-portal)
- [WhatsApp Vendor Portal](https://help.peakflo.co/accounts-payable?hsLang=en#whatsapp-vendor-portal)
- [Three-way Matching](https://help.peakflo.co/accounts-payable?hsLang=en#three-way-matching)
- [Accounts Receivable](https://help.peakflo.co/accounts-receivable?hsLang=en#main-content)
- [Getting Started](https://help.peakflo.co/accounts-receivable?hsLang=en#getting-started)
- [Invoice Management](https://help.peakflo.co/accounts-receivable?hsLang=en#invoice-management)
- [Workflow Management](https://help.peakflo.co/accounts-receivable?hsLang=en#workflow-management)
- [Actions](https://help.peakflo.co/accounts-receivable?hsLang=en#actions)
- [Customer Management](https://help.peakflo.co/accounts-receivable?hsLang=en#customer-management)
- [Customer Portal](https://help.peakflo.co/accounts-receivable?hsLang=en#customer-portal)
- [Collections](https://help.peakflo.co/accounts-receivable?hsLang=en#collections)
- [Reports](https://help.peakflo.co/accounts-receivable?hsLang=en#reports)
- [Credit Notes](https://help.peakflo.co/accounts-receivable?hsLang=en#credit-notes)
- [Integrations Page](https://help.peakflo.co/integrations-page?hsLang=en#main-content)
- [Basics](https://help.peakflo.co/integrations-page?hsLang=en#basics)
- [Peakflo API](https://help.peakflo.co/integrations-page?hsLang=en#peakflo-api)
- [Xero](https://help.peakflo.co/integrations-page?hsLang=en#xero)
- [NetSuite](https://help.peakflo.co/integrations-page?hsLang=en#netsuite)
- [Jurnal](https://help.peakflo.co/integrations-page?hsLang=en#jurnal)
- [Quickbooks](https://help.peakflo.co/integrations-page?hsLang=en#quickbooks)
- [Microsoft Dynamics 365 Business Central](https://help.peakflo.co/integrations-page?hsLang=en#microsoft-dynamics-365-business-central)
- [Microsoft Dynamics 365 Finance & Operations](https://help.peakflo.co/integrations-page?hsLang=en#microsoft-dynamics-365-finance-operations)
- [Zalo](https://help.peakflo.co/integrations-page?hsLang=en#zalo)
- [SFTP](https://help.peakflo.co/integrations-page?hsLang=en#sftp)
- [SAP](https://help.peakflo.co/integrations-page?hsLang=en#sap)
- [Travel & Expense Management](https://help.peakflo.co/travel-expense-management?hsLang=en)
- [Payment Automation](https://help.peakflo.co/payment-automation?hsLang=en)
- [Reports](https://help.peakflo.co/reports?hsLang=en)
- [Legal Notes](https://help.peakflo.co/legal-notes?hsLang=en)
- [General Questions](https://help.peakflo.co/general-questions?hsLang=en)
- [Guides for Partners](https://help.peakflo.co/guides-for-partners?hsLang=en)
- [Latest Releases](https://help.peakflo.co/latest-releases?hsLang=en)
- [Offboarding](https://help.peakflo.co/offboarding?hsLang=en)
- [Peakflo Ticket Portal](https://help.peakflo.co/peakflo-ticket-portal?hsLang=en)
- [Peakflo 20X](https://help.peakflo.co/peakflo-20x?hsLang=en)
[](http://peakflo.co)
peakflo.co Help Center
Copyright © 2026, Peakflo