When your finance team wants to approve purchase quotes, the PQs may also require the e-signature of the approver. Peakflo will also automatically convert the PQ into a PO, with the approver's signature on the PO PDF.
Content
2. Create a purchase order from a purchase quote
2. Approve and e-sign the purchase order
Create a purchase order
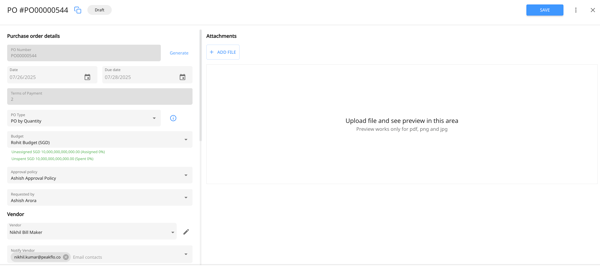
Go to "Purchase Order" under "Payables" and click on "Add New"

First, enter or generate the purchase order number.

To prevent missing PO number sequences (which can cause audit issues), Peakflo allows you to configure to hide the “Generate” button for PO number generation. To enable or disable contact support@peakflo.co
- Date: Enter the date the purchase order is being created.
- Due date: Specify the date by which payment or delivery is expected, according to your agreement with the vendor.
- Terms of Payment: Automatically updated based on the due date.
- PO Type: Select the type of purchase order, whether it's based on quantity or amount.
Note:
- PO by quantity means non-service PO
- PO by amount means service PO
- Budget: Assign the relevant budget
- Approval policy: Choose the applicable approval workflow
- Requested by: Enter the name of the team member initiating the purchase request.
- Vendor: Select or add the vendor who will be supplying the goods or services.
- Notify Vendor: Provide the contact details for the vendor to whom the finalized PO will be automatically sent upon approval.
- Account number: Include the vendor’s account number for reference, ensuring correct application of the order and payment.
- Additional Info: Here, fill out the custom field details.
- PO amount: Indicate the total value of the purchase order. Generally, auto-updated as per the sum of line items.
- Currency: Specify the transaction currency

Then fill out the line item details as follows:
- Line Item Name: Enter the name for each product or service
- Description: Provide a detailed description of the item, including specifications, model numbers, or any relevant details that clarify what is being procured.
- Chart of Accounts: Select the appropriate account code from your chart of accounts to ensure correct expense tracking and integration with your accounting system.
- Quantity: Specify the number of units being purchased for each line item.
- Unit: Indicate the measurement unit for the item (e.g., pieces, boxes, hours, kg).
- Unit Price: Enter the price per unit selected currency.
- Taxes: Add any applicable tax rates or amounts per line item.
- Amount & Discount: The system will calculate the line item amount based on quantity and unit price, factoring in any applicable discounts or promotional rates.
- Additional Info: Fill in any required line item custom field details

Finally, click "Save" to complete PO creation.
Create a purchase order from a purchase quote
Go to the "Approved" tab under the "Purchase Quotes" section.

Click on the purchase quote that you want to turn into a PO. A pop-up window will appear. Click on "Create PO".

A draft PO will be created with all the details from the PQ.

To send the PO to the vendor after full approval, remember to fill out the vendor contact in the "Notify Vendor" field.

You have the option to implement custom rules that automatically populate the details of the PO. For instance, if the PO requestor is Sam, then the Location custom field will automatically be set to New York. To add custom rules, check out: What are custom rules and how to set them up for accounts payable?
After the PO is approved, an automatic email will be sent to the vendor contact with the PO details. You can see the information in your PO Timeline.

Approve and e-sign the purchase order
1. Go to the "Pending approval" tab on the "Purchase Order" section.
2. Open the purchase order that is pending your approval and click on "Approve".

3. Once you click on "Approve", a new window will open up asking for your confirmation to add the e-signature to your purchase order.
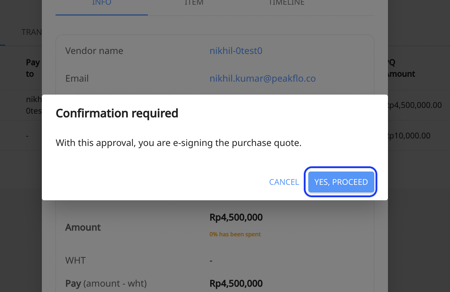
To enable e-signing, follow this article: How to enable PO signature from the company configuration?
4. Then click on the approved purchase order and the three dots on the top right side of the purchase order. Click on "Download PDF".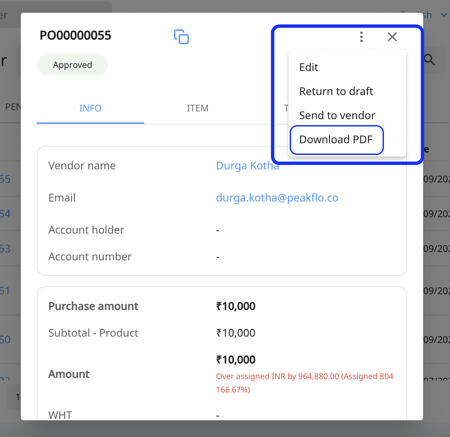
The e-signature will appear on the purchase order PDF along with PO details, PO creator and requester as well as custom fields, like the one below:
Related Article: How to edit my profile and upload my e-signature?
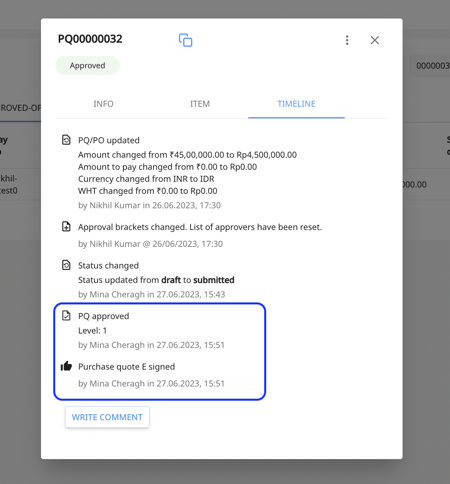
5. You can check the PO timeline details to see the signatory as well as the date and time the PO was e-signed.
FAQ
How can I determine if the Purchase Order has been synced to my ERP/accounting system?
To verify whether the Purchase Order (PO) has been successfully synced to your ERP or accounting system, you can check the "Sync Status" column associated with the PO in your Peakflo Purchase Order view. This column will provide real-time updates on the syncing process.

Is it possible to create a duplicate of a Purchase Order?
Yes, it is possible to create a duplicate of a Purchase Order once it has been approved. To do this, click on the approved PO, then select the three-dot menu button located at the top right corner of the pop-up box, and choose "Clone PO." A new draft PO will be generated, preserving all the original details for your convenience.

Why can’t I edit my Purchase Order after it’s approved?
Once a PO is approved, it becomes locked to prevent any changes. This ensures the information used for receiving and billing stays accurate and consistent. If you need to make changes, you’ll have to return the PO to draft stage.