---
title: How to Create and Apply Advance Payments?
description: Peakflo allows you to create an Advance Payment against a Purchase Order (PO) and later apply the paid advance to a bill raised against the same PO.
---
[Skip to content](https://help.peakflo.co/how-to-create-and-apply-advance-payments#main-content)
[](https://peakflo.co/)
- [Go to Customer Portal](https://help.peakflo.co/tickets-view)
- [Go to peakflo.co](https://peakflo.co/)
Open main navigation
Close main navigation
- [Go to Customer Portal](https://help.peakflo.co/tickets-view)
- [Go to peakflo.co](https://peakflo.co/)
Hello! How can we help you?
- There are no suggestions because the search field is empty.
1. [Help Center](https://help.peakflo.co/?hsLang=en)
2. [Accounts Payable](https://help.peakflo.co/accounts-payable?hsLang=en)
3. [Bill Management](https://help.peakflo.co/accounts-payable?hsLang=en#bill-management)
# How to Create and Apply Advance Payments?
## Peakflo allows you to create an Advance Payment against a Purchase Order (PO) and later apply the paid advance to a bill raised against the same PO.
### Contents
- [How to create an advance payment against a PO](https://help.peakflo.co/how-to-create-and-apply-advance-payments#adv-create)
- [How can the AP team apply the advance payment to a bill](https://help.peakflo.co/how-to-create-and-apply-advance-payments#apply-bill)
- [How can vendors apply the advance payment to an invoice in the vendor portal](https://help.peakflo.co/how-to-create-and-apply-advance-payments#apply-vendor-invoice)
Before you begin, note that advance payments must first be enabled as a configuration. Contact the Peakflo support team at [support@peakflo.co](mailto:support@peakflo.co) to request activation.
---
### **How to create an advance payment against a PO**
1\. Go to **Bills** and create a new bill.
2\. Select the **Vendor**.
3\. Under **Payment Type**, select **Advance Payment**.
4\. Select the PO against which you want to make the advance payment.
You can select **only one PO** for an advance payment bill.
5. Under **Amount to Pay**, clear the **Pay Full Amount** checkbox.
You will then see two options:
- **Percentage** – Enter the percentage of the total PO amount you want to pay as an advance.
- **Flat Amount** – Enter the exact amount you want to pay as an advance.
-Aug-27-2026-02-30-00-8538-AM.png?width=600&height=296&name=image%20(3)-Aug-27-2026-02-30-00-8538-AM.png)
For example, if the PO total is $100. A 20% advance = $20
The percentage is calculated against the **total PO amount**, not individual PO line items.
When creating an Advance Payment bill:
- You cannot edit the **quantity** or **unit price** of the PO linked.
- You cannot add new line items.
- You cannot delete existing line items.
- You cannot select multiple POs.
- The advance amount must be **less than or equal to the remaining PO amount**.
- You can create **multiple advance payments** against a single PO
The advance amount is calculated independently based on the total PO value.
6\. Review the vendor, PO, payment type, and advance amount, then save the bill.
7. Creating the advance payment bill does not make the advance available for application yet.
You must first **make the payment** for the advance payment bill.
- Open the Advance Payment bill.
- Complete the required approval steps.
- Make the payment.
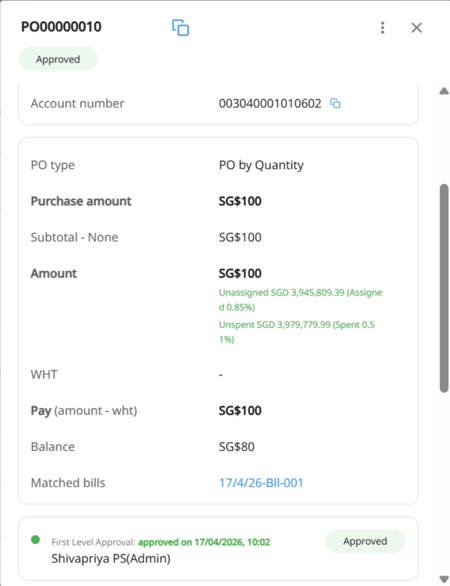
- Once the advance payment is marked as **Paid**, it becomes available to apply to an invoice.
8\. After the payment is made, you can see the PO **Balance** amount updates automatically.
---
### **How can AP team apply the advance payment to a bill**
1\. Go to **Bills** and create a new bill.
2\. Select the same **Vendor**.
3\. Select **Pay on Delivery** as the **Payment Type**.
4\. Match the bill to the same PO against which the advance payment was created
5\. Once the PO is matched, Peakflo displays the advance payments available for that PO under **Apply Advance Payment**.

6\. Review the available advance payments. **Select the checkbox next to the advance payment** you want to apply. The payable amount is automatically updated when you select the advance payment, shown as **Net Payable**.
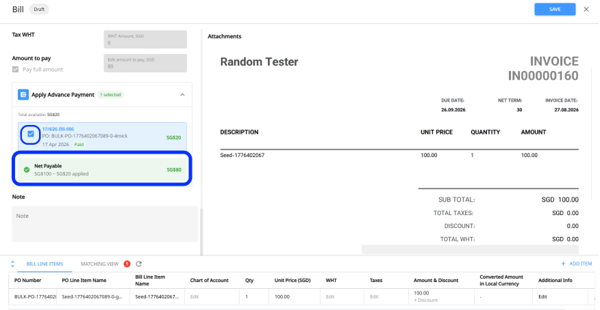
You can apply multiple advance payments to the same bill when applicable.

7. Review the bill and the applied advance amount, then save the bill. The remaining amount follows the normal bill approval and payment process.
---
### **How can vendors apply the advance payment to an invoice in the vendor portal?**
Vendors can apply an advance payment to an invoice through the Vendor Portal when the advance payment workflow is available to them.
1\. Create an invoice against the same PO linked to the advance payment.
2\. Review the available advance payments displayed for the PO.
3\. Select the advance payment you want to apply.
4\. Select multiple advance payments if applicable.
5\. Review the updated **Net Payable** amount.
-2.png?width=600&height=299&name=image%20(7)-2.png)
6\. Submit the invoice.
Peakflo automatically deducts the applied advance from the invoice amount. The remaining amount is processed according to the configured invoice approval and payment workflow.
- [New to Peakflo?](https://help.peakflo.co/new-to-peakflo?hsLang=en)
- [Accounts Payable](https://help.peakflo.co/accounts-payable?hsLang=en#main-content)
- [Getting Started](https://help.peakflo.co/accounts-payable?hsLang=en#getting-started)
- [Rules](https://help.peakflo.co/accounts-payable?hsLang=en#rules)
- [Approval Workflow](https://help.peakflo.co/accounts-payable?hsLang=en#approval-workflow)
- [Custom Fields](https://help.peakflo.co/accounts-payable?hsLang=en#custom-fields)
- [Vendors](https://help.peakflo.co/accounts-payable?hsLang=en#vendors)
- [Purchase Requests](https://help.peakflo.co/accounts-payable?hsLang=en#purchase-requests)
- [Purchase Quotes](https://help.peakflo.co/accounts-payable?hsLang=en#purchase-quotes)
- [Purchase Orders](https://help.peakflo.co/accounts-payable?hsLang=en#purchase-orders)
- [OCR](https://help.peakflo.co/accounts-payable?hsLang=en#ocr)
- [Bill Management](https://help.peakflo.co/accounts-payable?hsLang=en#bill-management)
- [My Approvals](https://help.peakflo.co/accounts-payable?hsLang=en#my-approvals)
- [Goods Receipt Notes & Service Receipt Notess](https://help.peakflo.co/accounts-payable?hsLang=en#goods-receipt-notes-service-receipt-notess)
- [Budget](https://help.peakflo.co/accounts-payable?hsLang=en#budget)
- [Reconciliation](https://help.peakflo.co/accounts-payable?hsLang=en#reconciliation)
- [Reports](https://help.peakflo.co/accounts-payable?hsLang=en#reports)
- [Wallet & Transactions](https://help.peakflo.co/accounts-payable?hsLang=en#wallet-transactions)
- [Payments](https://help.peakflo.co/accounts-payable?hsLang=en#payments)
- [Vendor Onboarding Management](https://help.peakflo.co/accounts-payable?hsLang=en#vendor-onboarding-management)
- [Vendor Portal](https://help.peakflo.co/accounts-payable?hsLang=en#vendor-portal)
- [WhatsApp Vendor Portal](https://help.peakflo.co/accounts-payable?hsLang=en#whatsapp-vendor-portal)
- [Three-way Matching](https://help.peakflo.co/accounts-payable?hsLang=en#three-way-matching)
- [Accounts Receivable](https://help.peakflo.co/accounts-receivable?hsLang=en#main-content)
- [Getting Started](https://help.peakflo.co/accounts-receivable?hsLang=en#getting-started)
- [Invoice Management](https://help.peakflo.co/accounts-receivable?hsLang=en#invoice-management)
- [Workflow Management](https://help.peakflo.co/accounts-receivable?hsLang=en#workflow-management)
- [Actions](https://help.peakflo.co/accounts-receivable?hsLang=en#actions)
- [Customer Management](https://help.peakflo.co/accounts-receivable?hsLang=en#customer-management)
- [Customer Portal](https://help.peakflo.co/accounts-receivable?hsLang=en#customer-portal)
- [Collections](https://help.peakflo.co/accounts-receivable?hsLang=en#collections)
- [Reports](https://help.peakflo.co/accounts-receivable?hsLang=en#reports)
- [Credit Notes](https://help.peakflo.co/accounts-receivable?hsLang=en#credit-notes)
- [Integrations Page](https://help.peakflo.co/integrations-page?hsLang=en#main-content)
- [Basics](https://help.peakflo.co/integrations-page?hsLang=en#basics)
- [Peakflo API](https://help.peakflo.co/integrations-page?hsLang=en#peakflo-api)
- [Xero](https://help.peakflo.co/integrations-page?hsLang=en#xero)
- [NetSuite](https://help.peakflo.co/integrations-page?hsLang=en#netsuite)
- [Jurnal](https://help.peakflo.co/integrations-page?hsLang=en#jurnal)
- [Quickbooks](https://help.peakflo.co/integrations-page?hsLang=en#quickbooks)
- [Microsoft Dynamics 365 Business Central](https://help.peakflo.co/integrations-page?hsLang=en#microsoft-dynamics-365-business-central)
- [Microsoft Dynamics 365 Finance & Operations](https://help.peakflo.co/integrations-page?hsLang=en#microsoft-dynamics-365-finance-operations)
- [Zalo](https://help.peakflo.co/integrations-page?hsLang=en#zalo)
- [SFTP](https://help.peakflo.co/integrations-page?hsLang=en#sftp)
- [SAP](https://help.peakflo.co/integrations-page?hsLang=en#sap)
- [Travel & Expense Management](https://help.peakflo.co/travel-expense-management?hsLang=en)
- [Payment Automation](https://help.peakflo.co/payment-automation?hsLang=en)
- [Reports](https://help.peakflo.co/reports?hsLang=en)
- [Legal Notes](https://help.peakflo.co/legal-notes?hsLang=en)
- [General Questions](https://help.peakflo.co/general-questions?hsLang=en)
- [Guides for Partners](https://help.peakflo.co/guides-for-partners?hsLang=en)
- [Latest Releases](https://help.peakflo.co/latest-releases?hsLang=en)
- [Offboarding](https://help.peakflo.co/offboarding?hsLang=en)
- [Peakflo Ticket Portal](https://help.peakflo.co/peakflo-ticket-portal?hsLang=en)
- [Peakflo 20X](https://help.peakflo.co/peakflo-20x?hsLang=en)
[](http://peakflo.co)
peakflo.co Help Center
Copyright © 2026, Peakflo